Hello, this is a very easy and fun look you can use for this Halloween. This will be the final look using Gold Colors.
Let's Begin:
We can either begin with moisturizing and priming our face/ foundation or leave the foundation towards the end to eliminate fall out.
You will use a primer or base for your entire lids, I used MACS paint pot in Soft Ochre.
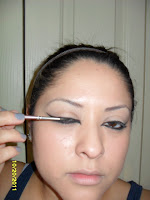
Using Black Track Fluid line from MAC you will line your eye and extend the end in a very straight line. Extend it past the end of your eye, this look is a bit extreme.
Using a cream eye liner you will rim the inner top and bottom water line. I used Make Up For Ever Aqua Eyes in OL. Once done this step, dry the tip of your liner since you will begin tracing the roundness of your eye. you will begin with the inner corner and lightly trace the crease up and towards the end of the line you made with the gel liner, remember to follow the roundness of your eye. Once you like the outcome, trace a straight line and connect it to the black track fluid line. Do this smoothly and lightly. You can go over and over until you are comfortable with the intensity. Finally grab your favorite black shadow and a pencil brush or eye liner brush and stamp the color on each section that you used the liner, this will set the color and allow long lasting results.
Using a Mac 239 Brush or a flat shader brush you will grab either the gold color in this case Make Up For Ever Metal Powder in 1 or a blue base as Make Up For Ever color case in blue. You will use the 239 and pat on the product, what do I mean pat on? well you will just put pressure to your brush and the product, don't circle or swerve too much because doing so will release a lot of powder. You want to pack on the product not dust it in.
If you are doing the blue look, then you will pack on the blue color base, if you don't have a blue color base you can use a blue cream liner and lightly warm in your finger and with your finger lightly pat on the product. Once you do this step then grab your favorite blue color, or in my case I used a mixture of Ben Nye's Cosmic Blue and MAC's sea and sky eyeshadow. Intensify to your liking by packing on the product, remember lightly pat the brush on the product do not swerve or circle too much.
If you feel that the colors mixed with the black liner then just repeat the liner & the black shadow.
If you decided to do your eyes first then foundation go ahead and do your foundation and concealer now, and set it with a loose powder for long lasting results.
Next, you will use your favorite contour color, usually a shade or two darker than yours, unless you want to be extreme like me and I used 3 shades darker. I usually begin with a highlight, for this look , I used the same metal powder as in the Gold look. Here I am using a MAC's 109 (I believe its discontinued) to tap on some of that color in top of my cheekbones. Then i cleaned off the brush really good and used MAC's shade in Blunt to contour. Using a dust of NARS orgasm blusher, I popped that in top of the contour area and below my highlight, very lightly.
Using these two brushes, or any alike, brush your brows and fill them in. I used MAC's Blunt mixed with Carbon. I focused on sharp brows, and extended my natural brows to exaggerate it a bit. I start by lightly lining the top of my brown, define the arch and then with what is left of the brush bring down to fill in the remainder of the brow. Then, grab some more product and lightly line the bottom.
I used a gold like lipgloss by NYX called 24k then dusted Make Up For Ever Metal powder in 1 on top of the gloss.
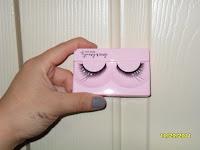
I used some flare lashes from forever21 which give a flirty look to the eyes, and the diamonds on these lashes give it the final touch.
To finalize, here is a shot of the products used for these looks:
Please let me know if you use this look :)
Have a safe and fun Halloween :)


